BSP Flashing Guide
This guide describes how to re-program the NVIDIA® Jetson AGX Orin™ on the AVerMedia D317 carrier board using a Linux host system.
Important: Data Loss and Pre-installed BSP
- Data Erasure: Flashing the BSP will erase all existing data on the target device, including the operating system, user data, and installed applications. Please back up important data before proceeding.
If your device already comes with the correct BSP pre-installed. You do not need to perform this flashing process unless re-flashing is required (e.g., system recovery, BSP upgrade, or configuration changes).
Before you start
Please ensure your environment meets the following requirements:
-
Host PC: A physical PC with a native Ubuntu 22.04 or 20.04 LTS installation. Virtual Machines (VMs) are not supported as they often cause USB connection stability issues during the flashing process.
-
USB Cable: A high-quality standard USB Type-C to Type-A (or Type-C) cable.
-
BSP Package: Download the installation files from the AVerMedia Official Website.
Hardware Setup
To flash the system, you must connect the carrier board to the host PC and enter Force Recovery Mode.
Enter Force Recovery Mode
Follow these steps to put the device into Force Recovery Mode:
-
Ensure the DC power adapter is disconnected from the carrier board.
-
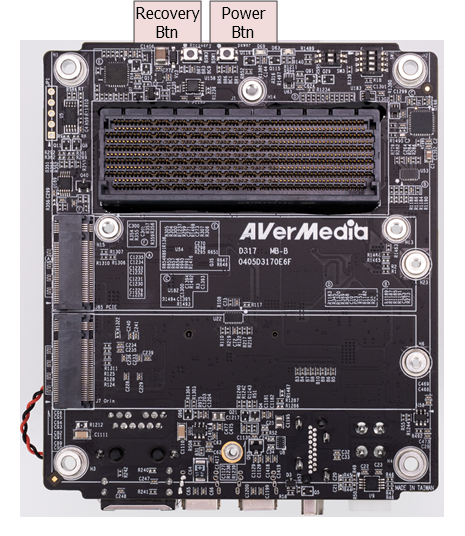
Press and hold the Recovery Btn.
-
While holding the Recovery Btn, plug the DC power adapter into the carrier board to power on the system.
-
Release the Recovery Btn after 2 seconds.
Note
The carrier board features two buttons: Recovery Btn and Power Btn. Please ensure you are holding the Recovery Btn (the one on the left in the image above) while applying power to successfully enter Force Recovery Mode.
Connect carrier board to host PC
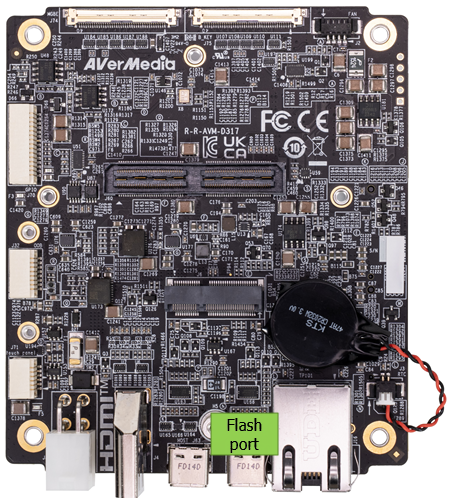
- Connect the Flash Port (USB Type-C) on the carrier board to the USB port on your Linux host PC.
-
Verify that the device has successfully entered recovery mode by running the following command on your host PC:
You should see an entry similar to:
Bus 001 Device 005: ID 0955:7223 NVIDIA Corp. APX
Note
Only the Type-C port highlighted above supports flashing mode. Please ensure you connect to this specific port.
Flashing the System
Once your device is connected and in Recovery Mode, follow these steps on your host PC to begin the flashing process.
-
Decompress the BSP Package: Use root privileges to extract the package to ensure all file permissions are preserved.
-
Enter the L4T Directory:
-
Configure Board and Camera Profile: Run the setup script and follow the interactive menu to select your hardware configuration.
Selection Example: When prompted, select the options that match your hardware (e.g., D317 and AGX Orin).
Please select AVerMedia carrier board: -------------------------------------------- 0) D315 1) D317 2) D317+ETH 3) D317+USB -------------------------------------------- Enter your choice: 1 Select Platform: -------------------------------------------- 0) AGX Orin 1) AGX Orin Industrial -------------------------------------------- Enter your choice: 0 -
Set Up Default User Account: We recommend using the default account configuration for consistency.
Default Credentials
The default username and password will be set to
nvidia. You can change these settings later within the Ubuntu system after the first boot. -
Execute Flash Script: Start the final flashing process.
Troubleshooting
The install.sh script is designed to report most environmental issues. If the process fails, please follow the on-screen prompts or check the common factors below:
| Issue | Possible Cause | Recommendation |
|---|---|---|
| Permission errors | Missing sudo during tar |
Extract the BSP package using sudo to preserve system file permissions. |
| "Device not found" | Port or Recovery status | Ensure you are using the correct Flash Port and the device is in Force Recovery Mode. |
Technical Support
If you encounter an error message you cannot resolve, please contact our support team or visit our Support Page.
Post-Flashing Steps
- Monitor Connection: Connect a monitor to the DisplayPort or HDMI port of the D317.
- Initial Setup: After the flashing process is complete, the system will reboot automatically. Since you have already created a user, you will be taken directly to the Ubuntu login screen.
Next Step
Now that your system is successfully flashed, please proceed to the Getting Started Guide to verify your camera functionality and run the AI demo.